 Australian Dollars
 US Dollars
 European Euros
 New Zealand Dollars
Sifting Through the Soil:
A Simple Soil Science Test
You can help your soil support your plants, flowers, trees, shrubs, and lawns by learning what it is made of. Testing your soil involves a simple do-at-home science experience that you can complete in an afternoon.
Like many gardeners, I tend to focus my efforts at ground level. I weed, water, and mulch on a regular basis. I replace plants that don’t make it through various weather stressors and give a little TLC to those that did. But it turns out the interactions under the soil may be at the root of much that goes right—and wrong—for my lawn, trees, flowers, plants and vegetables.
Of course we all think about soil, right? That’s why we mulch and fertilize. But soil isn’t a constant: it gets depleted and if you don’t like what it’s doing to your plants, it can be changed for the better. The easiest way to get to know your soil better is to figure out what it is made of and what it is lacking. For that, there’s the mason jar test.
WHY TEST YOUR SOIL?
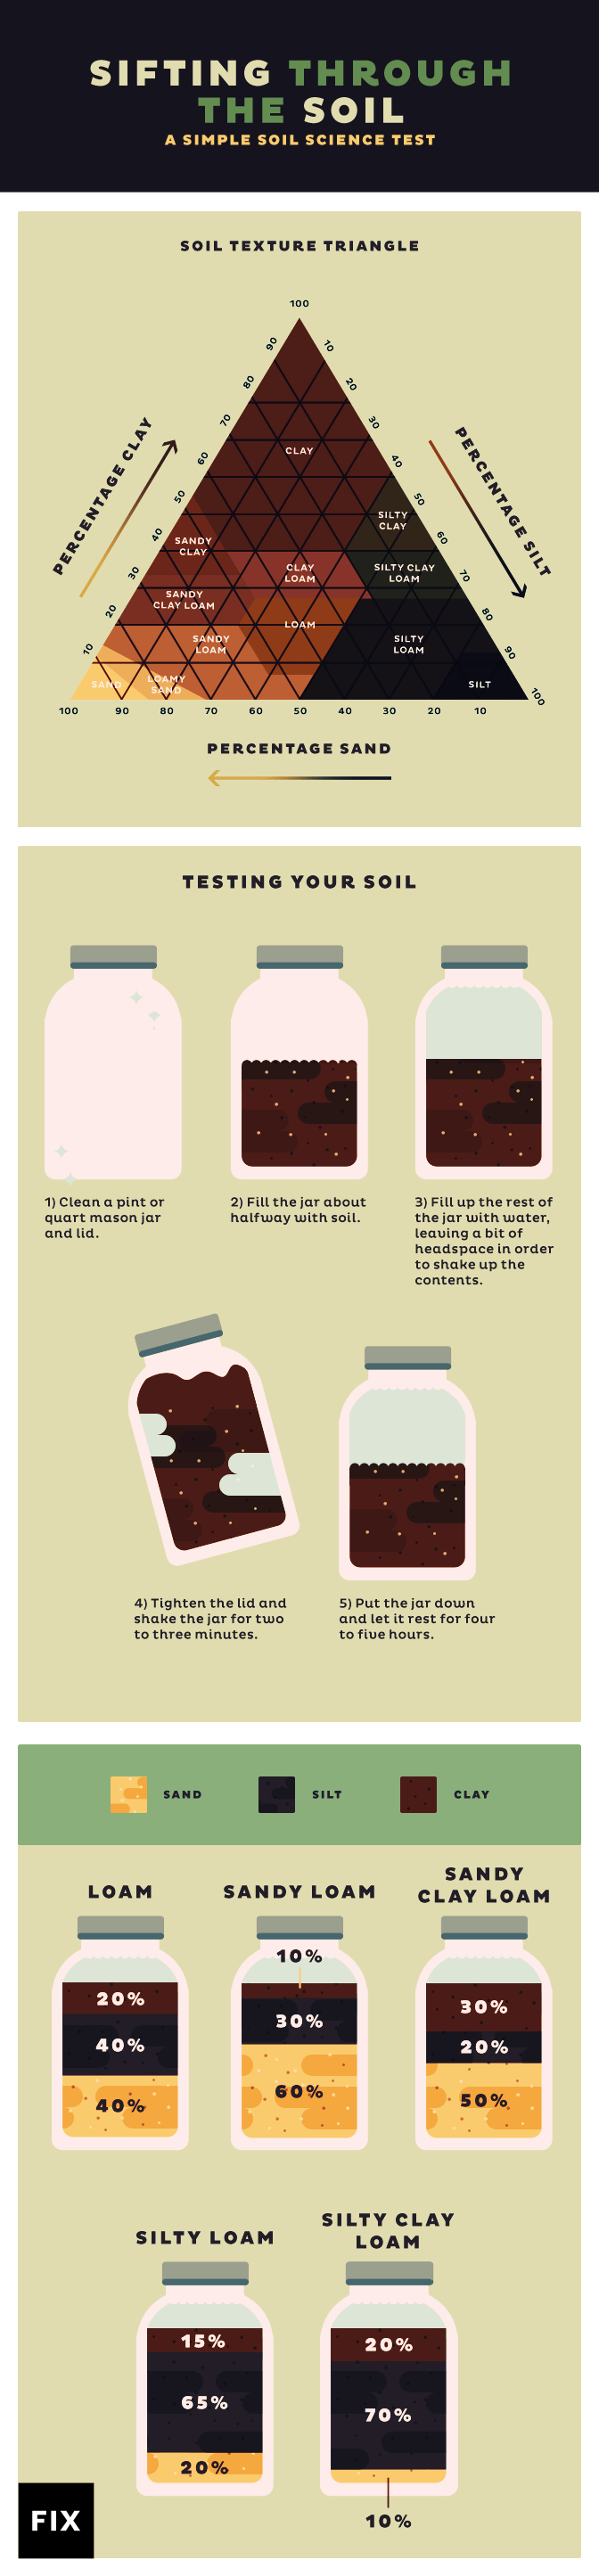
Dirt may look pretty straightforward—dirt is dirt, right? But the soil in your garden beds and under your lawn is actually made up of several components: clay, sand, and silt, as well as water, air, and organic matter. The proportions of clay, sand, and silt are what determine how well your soil supports the things that are growing, how much moisture it holds, and how well it drains.
Of those three, clay and sand are the most familiar. When viewed up close and under a microscope, clay is the smallest mineral and it holds tight to water. The problem? Too much clay in your soil and you end up with a sticky, mucky mess that won’t drain and stays cold much longer in the spring than sand or silt.
Silt is the middle-size element in soil, while sand particles are the largest. Just like sand at the beach, sand in your soil drains quickly and has trouble holding onto essential nutrients that plants rely on. Translation? You have to water and fertilize lots more than you probably want to.
When silt, sand, and clay combine in just-right proportions, the result is loam. That’s the holy grail of garden soil, the black gold that will help your plants stay nourished, drain well, and retain water when needed.
If the percentages of sand, silt, and clay in your soil are less than ideal, you’ll also be able to feel differences in the soil. Sandy soil is gritty, and if wet it doesn’t hold its shape. Clay soil is sticky—think playing with clay when you were a kid—and holds together too firmly. Loam will feel rich and hold its shape when wet, but breaks apart into meaty pieces.
HOW TO TEST YOUR SOIL
Most state extension services will perform a detailed soil analysis for a small fee, but you have to wait for the results. Many people take a soil sample in spring, but you can home-test the soil at any time during the year. There are soil test kits for sale at most home improvement stores, but a no-cost, at-home soil test is simple, can be done in any spot in your garden, and takes just a glass jar. Once you complete the test, you can use the results to figure out what to add to your soil to improve it.
Step-by-Step Soil Test
-
- Clean a pint or quart mason jar and lid
- Fill the jar about halfway with soil. I like to do several different tests, isolating spots in the garden—a jar from each flower bed, for example. That’s because the soil may differ from spot to spot
- Fill up the rest of the jar with water, leaving a bit of headspace in order to shake up the contents
- Tighten the lid and give the jar a good shake for two to three minutes
- Put the jar down and let it rest for four to five hours. As the jar is resting, you might notice the soil doing something interesting: It’s separating into distinct layers: sand at the bottom, silt in the middle, and clay at the top.
ANALYZE YOUR SOIL
After completing the soil test, you need to determine the percentages in your mason jar. Measure each of the three layers and calculate approximately how much space each takes up in the jar. That’s the approximate makeup of your soil, and indicates what soil type you have
HOW TO FIX YOUR SOIL
Once you’ve tested your soil and found it lacking, you have several options for your plants. If you haven’t dug a garden bed or hole for a new tree, you can try to find a better spot in your landscape, one that has soil that’s closer to loam that your original site.
But for existing garden beds or just-perfect landscape spots, there are ways to try to improve the soil. The simplest way to improve any soil that’s less than ideal is to add organic matter, such as compost, regularly. If you purchase compost, add a 2-inch-thick layer in spring. Mulch made of organic matter—wood chips, for example—helps, too, as do yard trimmings—pretty much anything that decomposes and makes your less-than-ideal soil more amenable to growing plants successfully.
Source: Fix.com